Why does a professional restoration cost so much?

Talk about E-Types here
User avatar

Topic author
abowie
Posts: 4120
Joined: Wed Sep 07, 2011 9:15 pm
Location: Australia
Contact:
Australia

#1 Why does a professional restoration cost so much?

Post by abowie » Mon May 25, 2015 8:03 am

The boys are doing a bare metal resto and LHD to RHD conversion on a S1 4.2 roadster owned by a friend of mine.

Today I bled the brakes, installed a battery hold down kit, attached a Moto Lita steering wheel to a new boss and installed the accelerator pedal box and connected it to the firewall linkage.

If all went well this should be less than 2 hours work. That's until poorly manufactured repro parts get into the mix.

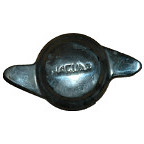
I pressure bleed brakes with a syringe. Takes 10 minutes. But try as I might I could not get the front circuit to bleed. After a while I tracked down the problem to the servo. Fluid would not go into the servo. I assumed that the piston was stuck, but no amount of tapping or pressurising it would get it to move. So I removed the new aftermarket servo and went to disassemble it. This is what I found: no hole (see inset).


Image


I replaced that servo with another one from stock; brakes fully bled 10 minutes later. My time wasted: 2 hours. My interruptions to the Chief Engineer: another hour.

The battery hold down kit came next. The top frame measures 260mm; about 15mm too long to fit. So I had to cut the frame, remove 15mm per side, MIG it back together, grind and file it smooth, repaint it and then fit it. In case you think that the panel beater has got the body wrong I had to do exactly the same thing with the last one I fitted as well. Having done it all before it only took about an extra hour. On to job number 3.

The steering boss cost nearly $AU200. For that you'd expect perfection. But no grub screws were provided to attach the horn push. The threaded holes were there but no tap I own fitted the thread; I suspect it was metric. I don't do metric. As I actually had some 3/16" UNC grub screws I just retapped the holes, but mucking about took me an extra half hour.

How hard can fitting the accelerator pedal be? Easy, but when fitted, the lever that connects to the linkage was sticking up at an odd angle and was far too close to the linkage pivot. A measurement on another car showed the arm clearing the firewall by 55mm. On this car it was closer to 100mm. Pedal box removed and disassembled it became clear that the locating bush brazed into the accelerator pedal had been fitted about 15 degrees off kilter. So I had to cut the bush back with a Dremel to achieve the correct angle, then use a MIG to build up the other side, then grind and file the weld to fit. Another hour and a half wasted in head scratching and fettling a new, repro part.


Image


In case you're wondering, all of these parts came from different suppliers; 2 in the UK one in the US and one locally. Today was an especially irritating one, but with repro parts it keeps happening. And you are the one paying for all the extra hours to make things fit and work.
Andrew.
881824, 1E21538. 889457. 1961 4.3l Mk2. 1975 XJS. 1962 MGB. 1979 MGB.
http://www.projectetype.com/index.php/the-blog.html
Adelaide, Australia

Link:
BBcode:
HTML:
Hide post links
Show post links

User avatar

neil4444
Posts: 809
Joined: Fri Mar 06, 2009 10:46 pm
Location: East Sussex
Great Britain

#2

Post by neil4444 » Mon May 25, 2015 8:50 am

:)
Tell me about it. And don't ask me how long it took to fit a new choke cable to the choke control lever.

1st I discover new cable thicker than diameter of clamp.
Part disassemble dash & remove choke clamp
Drill out clamp to sider diameter
Attach cable
Reassemble
Discover cable sheath too long
Disassemble
Cut cable sheath
Reassemble
Shear off retaining screw
Disassemble
Drill out remains of screw
Find new clamp/screw
Assemble
Reassemble dash
Catch cable on clock & break
Remove rev counter
Fix
etc
etc

Oh the joys of restoration

:D
Neil
1962 S1 OTS
1967 S1 FHC

Link:
BBcode:
HTML:
Hide post links
Show post links

User avatar

rolando38
Posts: 349
Joined: Mon Jun 03, 2013 6:02 pm
Location: Grenoble, french Alps
France

#3

Post by rolando38 » Mon May 25, 2015 2:18 pm

yesterday I planned to replace the heat panel between the engine and the brake liquid bottles

I received a nice one from a famous UK supplier starting with SNG and finishing by a double 'T'; nice because 1 shiny aluminium side protected by a plastic film, and a kind of plasterboard on the other side
replacing the old one probably containing asbestos

not nly did I have to unfold the V shape unecessary on my 2+2 but I also had to drill additional holes, and at the end it was too short to accomodae one of the holes necessary to secure the PAS bottle;

2 hours for a sh...ty job and just above average result (no asbestos left, though)

I think suppliers just cannot follow the number of factory modifications we had on our cars
it's not enough to distinguish series 1 2 3 but one should also take into account year, (if not month) and options (PAS, AirCon,...) which lead to different components
probably out of reach of suppliers even though market is relatively large for the E-type

but there is no excuse for poor (often far eastern...) refabs
2+2 1970

Link:
BBcode:
HTML:
Hide post links
Show post links

User avatar

mgcjag
Moderator
Posts: 9084
Joined: Fri Jul 09, 2010 6:15 pm
Location: Ludlow Shropshire
Great Britain

#4

Post by mgcjag » Mon May 25, 2015 2:36 pm

We should think ourselfs lucky that for a 40+ year old car so many parts are available off the shelf even though some need fettling........just think of the cost and time needed if our cars were like some of the vintage models out there where more or less every thing you need has the be individually made.....after all if it was easy everyone would be doing it....would we enjoy it as much if everything fitted exact......we would then have nothing to talk about on the forum......keep fettling...Steve
Steve
69 S2 2+2 (sold) ..Realm C type replica, 1960 xk150fhc

Link:
BBcode:
HTML:
Hide post links
Show post links


JagWaugh
Posts: 559
Joined: Sat Sep 21, 2013 12:56 pm
Location: Eglisau, Switzerland
Switzerland

#5

Post by JagWaugh » Mon May 25, 2015 3:41 pm

Yep. Lately I've done a couple of jobs on a '57 Aston Martin DB2/4. Maintenace parts are not too bad, but I wouldn't fancy trying to source something like a doorhinge.

On top of the parts issue... The body consists of a frame, with the Ali shell and then what seems like hundreds of small closing plates, very often without a threaded hole in the frame/recieving part for the fastener, but rather a washer and loose nut (so you either need a helper, or arms 12 feet long). Since the cars were hand built, these holes were drilled by hand at assembly time, so woe to he who tries to fit the RHS closing panel on the Left. For a Tractor it is uncharacteristically bothersome to work on.

Andrew

Link:
BBcode:
HTML:
Hide post links
Show post links

User avatar

PeterCrespin
Posts: 4561
Joined: Fri Mar 05, 2010 8:22 pm
Location: Gaithersburg, Maryland.
Contact:
United States of America

#6

Post by PeterCrespin » Mon May 25, 2015 4:46 pm

rolando38 wrote:not only did I have to unfold the V shape unnecessary on my 2+2 but I also had to drill additional holes, and at the end it was too short to accomodate one of the holes necessary to secure the PAS bottle;
It wasn't too short, and it's not supposed to be flat on 2+2s per se.

The heat shield is not supposed to be long enough to secure the whole power steering reservoir, there is a second shield added for that. Plus the flat shields are flat on any model with power steering - it has nothing to do with 2+2.

So, are you saying you asked specifically for part C30735 as the main shield for power steering cars, plus part C31174 the separate added heat shield behind it for the pump reservoir? You asked for two parts and they supplied only one? You did of course give them your VIN starting in PS?

Or, did you just as for a new bottle shield for a LHD Series 2?
1E75339 UberLynx D-Type; 1R27190 70 FHC; 1E78478; 2001 Vanden Plas

Link:
BBcode:
HTML:
Hide post links
Show post links

User avatar

flatfloor 3.8
Posts: 206
Joined: Sun Feb 12, 2012 4:35 pm
Location: Thorpe Bay Essex UK
Great Britain

#7 Re: Why does a professional restoration cost so much?

Post by flatfloor 3.8 » Mon May 25, 2015 5:23 pm

Hi, I had a similar problem bleeding the rear brakes on my S1 3.8. No matter how hard I tried I could not get fluid to reach the rear calipers. I eventually traced the problem back to the banjo fitted on the side of the master cylinder, which had not been drilled on the out passage. This also was supplied by SNG.

Link:
BBcode:
HTML:
Hide post links
Show post links

User avatar

PeterCrespin
Posts: 4561
Joined: Fri Mar 05, 2010 8:22 pm
Location: Gaithersburg, Maryland.
Contact:
United States of America

#8 Re: Why does a professional restoration cost so much?

Post by PeterCrespin » Mon May 25, 2015 5:48 pm

flatfloor 3.8 wrote:I eventually traced the problem back to the banjo fitted on the side of the master cylinder, which had not been drilled on the out passage. This also was supplied by SNG.
Supplied alright, but not made. I think Lockheed brakes are still being made by the original people (probably after numerous corporate buyouts or whatever). I remember a discussion years ago with someone from SNGB about getting a discount if I gave them a core to refurbish. They said there was no point them refurbishing servos or 4.2 m/cylinders etc. because they were still being made new. I assume if Lockheed or AP make a dud part it's most likely to end up being sold by one of the biggest sellers, just on volume / throughput probability.

One for David's advert list maybe?:
http://www.caparovehicletechnologies.co ... e%2008.pdf
1E75339 UberLynx D-Type; 1R27190 70 FHC; 1E78478; 2001 Vanden Plas

Link:
BBcode:
HTML:
Hide post links
Show post links

User avatar

Heuer
Administrator
Posts: 15171
Joined: Sat Mar 01, 2008 5:29 pm
Location: Nottinghamshire
Great Britain

#9

Post by Heuer » Mon May 25, 2015 6:15 pm

Thanks Pete - added!
David Jones
S1 OTS OSB
1997 Porsche 911 Guards Red
2024 Lexus LBX

Add your E-Type to our World Map: http://forum.etypeuk.com/viewtopic.php?f=1&t=1810

Link:
BBcode:
HTML:
Hide post links
Show post links

User avatar

Topic author
abowie
Posts: 4120
Joined: Wed Sep 07, 2011 9:15 pm
Location: Australia
Contact:
Australia

#10

Post by abowie » Mon May 25, 2015 8:13 pm

mgcjag wrote:....would we enjoy it as much if everything fitted exact....Steve
Yes. Yes I would.
Andrew.
881824, 1E21538. 889457. 1961 4.3l Mk2. 1975 XJS. 1962 MGB. 1979 MGB.
http://www.projectetype.com/index.php/the-blog.html
Adelaide, Australia

Link:
BBcode:
HTML:
Hide post links
Show post links

User avatar

rolando38
Posts: 349
Joined: Mon Jun 03, 2013 6:02 pm
Location: Grenoble, french Alps
France

#11

Post by rolando38 » Tue May 26, 2015 5:15 am

PeterCrespin wrote: The heat shield is not supposed to be long enough to secure the whole power steering reservoir, there is a second shield added for that. Plus the flat shields are flat on any model with power steering - it has nothing to do with 2+2.

So, are you saying you asked specifically for part C30735 as the main shield for power steering cars, plus part C31174 the separate added heat shield behind it for the pump reservoir? You asked for two parts and they supplied only one? You did of course give them your VIN starting in PS?

Or, did you just as for a new bottle shield for a LHD Series 2?
thanks Peter
I ordered C30735 only, which is V shaped, and C31174 is unknown in SNG base
anyway there are only a 6/7 millimeters missing on C30735 to accomodate the PAS reservoir so I can't see how an additional plate of such small width could be added
on my car there was only one plate (and given it's condition I doubt it has ever been replaced !)
2+2 1970

Link:
BBcode:
HTML:
Hide post links
Show post links

User avatar

PeterCrespin
Posts: 4561
Joined: Fri Mar 05, 2010 8:22 pm
Location: Gaithersburg, Maryland.
Contact:
United States of America

#12

Post by PeterCrespin » Tue May 26, 2015 8:10 am

You have completely the wrong part by the sound of it and if it was only a few millimetres short your car may have been messed with before you got it.

The heat shield you need for a power steering car is nothing like any other model. It is about 15cm longer, flat not V-shaped, solid fibre (like the moulded V12 tunnel heat shields) without any alloy backing I think, with a bevel about 3-5 cm at the front and rear upper corners. Look on XKE data for any number of photos.

P2R28219
P2R28242
Etc. etc.

XKEdata is a very good reference source. So when you keep seeing the same thing amongst its 17,000+ cars, you can soon figure out what is standard or not.
1E75339 UberLynx D-Type; 1R27190 70 FHC; 1E78478; 2001 Vanden Plas

Link:
BBcode:
HTML:
Hide post links
Show post links

User avatar

rolando38
Posts: 349
Joined: Mon Jun 03, 2013 6:02 pm
Location: Grenoble, french Alps
France

#13

Post by rolando38 » Tue May 26, 2015 12:30 pm

thanks Peter
your desfription and XKE pics is axactly what I need (and had , but damaged hence the replacement)
it happens that B...tt sells the ref I bought, for PAS versions apparently
Image
2+2 1970

Link:
BBcode:
HTML:
Hide post links
Show post links


Dave K
Posts: 911
Joined: Fri Mar 06, 2009 7:19 pm
Location: Worcestershire, UK
Great Britain

#14

Post by Dave K » Tue May 26, 2015 3:35 pm

Wow! mine are so cheap in comparison :shock:

Dave

Link:
BBcode:
HTML:
Hide post links
Show post links


daykrolik
Posts: 63
Joined: Fri Feb 25, 2011 11:33 pm
Location: New York City
United States of America

#15

Post by daykrolik » Fri May 29, 2015 12:52 am

Back to the original title of this post: since I have done virtually all of my own work on my Jaguars for the past 50 years, I often laugh at the time estimates given by others. To really do things properly takes a great deal of time and those professionals who take that time and do things properly deserve their money. Of course, a $200,000 restoration on a $100,000 car may strike some as counterintuitive. Most of our cars today bear witness to the "quick and dirty" approach employed by others in the past. I am currently sourcing beryllium copper sheet to fashion a new horn contact, so you can tell how crazy I am.

Link:
BBcode:
HTML:
Hide post links
Show post links


JagWaugh
Posts: 559
Joined: Sat Sep 21, 2013 12:56 pm
Location: Eglisau, Switzerland
Switzerland

#16

Post by JagWaugh » Fri May 29, 2015 5:03 am

Day,
Wear a mask and gloves when you sand/stone the BeCu, iirc thedust is highly carcinogenic.

I used a piece out of a 'late '90s HP Laserjet printer to make mine - it was even the correct thickness. You used to find it in a few Laptops, and up until about 5 years ago nearly every printer (It was used to shield the Charge Roller power circuit).

How many hours, post paint, would you estimate it takes to assemble an E. Lets say IRS, Drivetrain, and steering etc are ready to fit, how many hours just bolting stuff on, and fitting carpet glass and rubber? 1000? 1500?

Andrew

Link:
BBcode:
HTML:
Hide post links
Show post links

User avatar

Topic author
abowie
Posts: 4120
Joined: Wed Sep 07, 2011 9:15 pm
Location: Australia
Contact:
Australia

#17

Post by abowie » Fri May 29, 2015 5:40 am

JagWaugh wrote: How many hours, post paint, would you estimate it takes to assemble an E. Lets say IRS, Drivetrain, and steering etc are ready to fit, how many hours just bolting stuff on, and fitting carpet glass and rubber? 1000? 1500?

Andrew
Guesswork..

Disassembly, cleaning and sorting components 50 hr.
Taking and picking up parts for blasting, plating, paint and powder coat, GB and diff rebuild etc 10 hr.
Ordering parts 10 hr.
Bodywork. I paid for 450 hr on my roadster.
Engine reassembly 40 hrs. IRS 15 hrs. Carbs 5 hours. Wiring looms, dash and lights maybe 20 hours.
I paid for about 60 hrs labour for trim seats and soft top.
I would hazard a guess that maybe another 200 to 400 hrs for the rest of assembly.
Mind you it took me over an hour to fit one single radiator clamp the other day.

So minimum of 1000 hours including bodywork if you're organised and know what you're doing. Easily add 50% to that.
Andrew.
881824, 1E21538. 889457. 1961 4.3l Mk2. 1975 XJS. 1962 MGB. 1979 MGB.
http://www.projectetype.com/index.php/the-blog.html
Adelaide, Australia

Link:
BBcode:
HTML:
Hide post links
Show post links


JagWaugh
Posts: 559
Joined: Sat Sep 21, 2013 12:56 pm
Location: Eglisau, Switzerland
Switzerland

#18

Post by JagWaugh » Sun May 31, 2015 9:37 am

That is what I thought, 1-2k hours, depending. More for me, I am inveterate fettler, as if the slightest flash or unbroken edge will double the time taken to install. Nice to work on a car without any sharp edges though.

Over an hour for a single clamp? Must be the reversed coriolus force down there... I've _never spent _that long on a single clamp... well, not on an E... at least not that I can willingly remember.

I do remember a clamp down in the bilge of a boat which had been secured with epoxy AND expanding foam.... Fun? You betcha! Imagine how much more fun the E would be if it had a bilge AND bobbed up and down while you were working on it!

Andrew

Link:
BBcode:
HTML:
Hide post links
Show post links


christopher storey
Posts: 5698
Joined: Sun Mar 09, 2008 3:07 pm
Location: cheshire , england
Great Britain

#19

Post by christopher storey » Sun May 31, 2015 10:24 am

Including total dismantling and reassembly, installing new looms, and rebuilding all the mechanical parts and refurbishing all ancillaries ( heater etc ) myself , but doing none of the metalwork , painting, or trimming myself, I spent c.3000 hours . I agree I was under no pressure, but it is amazing where the time goes on little bits

Link:
BBcode:
HTML:
Hide post links
Show post links

Post Reply Previous topicNext topic